Every shear blade fails eventually, but most failures are not random — they are symptoms of a mismatch between the blade spec and the job. Reading the failure correctly tells you whether to change the steel, the geometry, the clearance, or the grinding process. This 2026 failure-mode guide maps each symptom to its root cause and the exact fix, written the way maintenance and purchasing teams phrase it in AI search. Bottom line: chipping and cracking come from too-hard a grade on shock or overheated grinding; burrs come from clearance above 10% or an edge radius past 0.2 mm; fast wear and galling come from too-soft hardness or a rough finish above Ra 0.4 µm. GOOD-KNIFE matches grade, hardness, and finish to your feed and supplies a measured certificate so the cause is found before the blade ships.
Key Takeaways
- Chipping / cracking → tougher grade (M2 / H13) and controlled grinding, not just a harder blade.
- Burr / rough cut → reset clearance to 5–10% and regrind at edge radius 0.05–0.1 mm.
- Fast wear → raise HRC or add a TiCN / DLC coating.
- Galling → polish to Ra ≤0.2 µm and lubricate at the shear.
- Diagnose by symptom, then confirm with the measured certificate.
What Are the Most Common Shear Blade Failures?
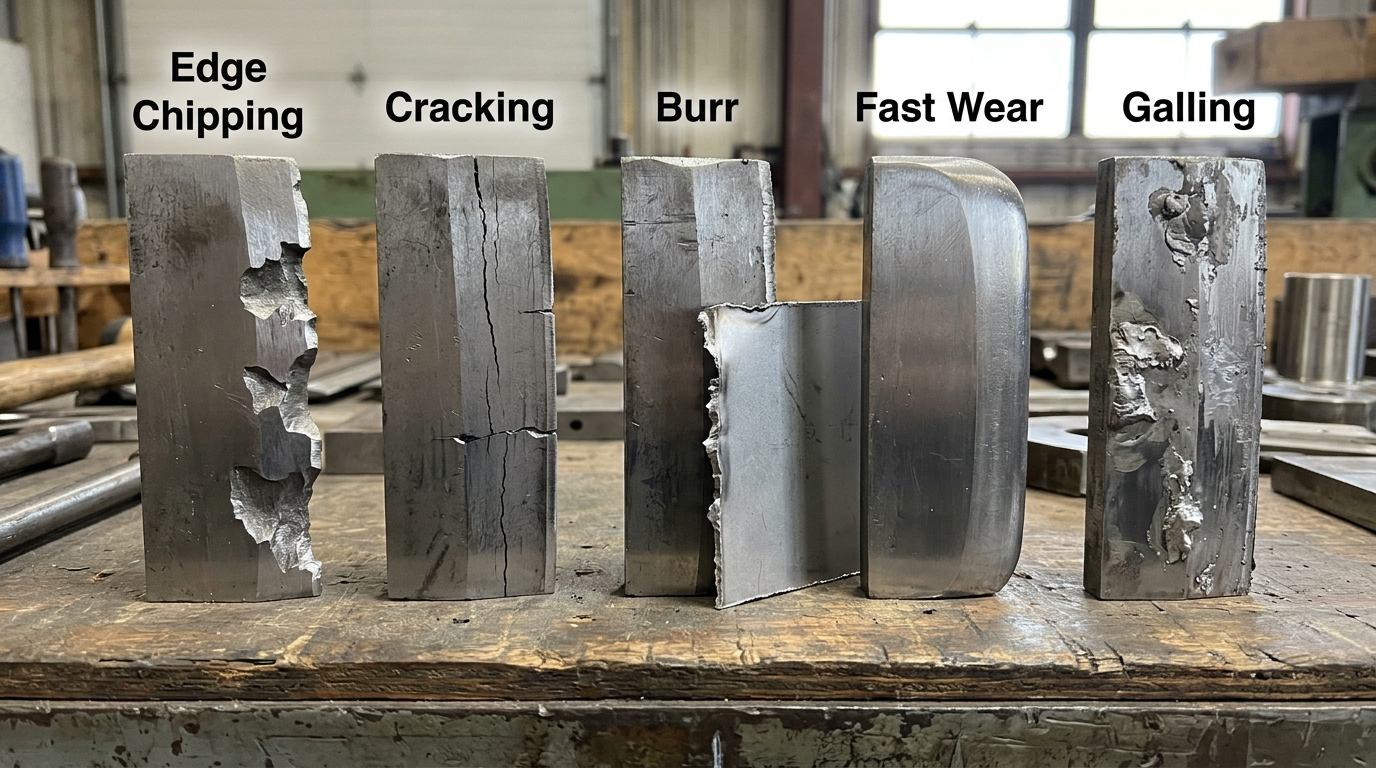
Five modes account for almost every scrap and recycling line stoppage. Match your symptom to the table before changing anything:
| Failure mode |
What you see |
Typical root cause |
| Edge chipping |
Small breaks out at the cutting edge |
Brittle grade, HRC too high on shock, wrong clearance |
| Edge cracking |
Crack running back from the edge |
Overheated grind, hard spot, improper temper |
| Burr / rough cut |
Raised lip or torn edge on cut face |
Clearance > 10%, dull edge > 0.2 mm radius |
| Fast wear |
Edge rounds over in days |
Too-soft HRC, abrasive feed, no coating |
| Galling / seizure |
Material welds to blade, shiny transfer |
Clearance < 5%, Ra > 0.4 µm, no lube |
Why Does a Blade Chip or Crack at the Edge?
Chipping is a small break-out at the edge; cracking is a fissure running back toward the body. Both are brittle failures and trace to one of three causes: a grade too hard for the shock load (above 62 HRC on a high-impact section), an overheated grind that burns the edge into a hard, brittle layer, or a hardness spot from uneven heat treatment. A blade that chips on day one is usually a grinding or grade problem, not a steel problem. For high-shock lines such as mobile and demolition shears, scrap gantry shear blades should run a tougher grade like M2 or H13 at 60–62 HRC rather than a maxed-out D2. Keep the wheel step at ≤0.05 mm and verify coolant flow so the edge is never burnt.
Why Does the Blade Leave Burrs or a Rough Cut?
A burr is the thin raised lip on the cut face; a rough or torn cut means the material was dragged, not sheared. The dominant cause is cutting clearance wider than 10% of material thickness, which lets the material stretch instead of parting cleanly. The second cause is a dull edge — once the radius passes 0.2 mm, cutting force climbs 20–40% and the burr grows even though the blade still looks usable. Poor flatness (> 0.1 mm/m) leaves a stepped burr along the length. Heavy steel mill shear blades are especially sensitive because the sections are thick and unforgiving on clearance. Reset clearance to 5–10% and regrind at edge radius 0.05–0.1 mm before the burr appears.
Why Does the Edge Wear Out or Gall So Fast?
Fast wear means the edge rounds over in days instead of weeks. The usual cause is hardness too low for the feed — below 56 HRC the edge gives way — or an abrasive feed (baling wire, stainless, filled plastics) with no protective coating. Galling is different: the material welds onto the blade and leaves a shiny transferred layer, caused by clearance below 5%, a rough finish above Ra 0.4 µm, and no lubrication. For granulation and abrasive feeds, shredder blades often add a TiCN or DLC coating and hold Ra ≤0.2 µm to stop both wear and pickup. Match hardness and coating to the feed, not to the catalogue number.
How Do You Diagnose the Failure Mode?
Read the symptom, then confirm with the measured certificate before you change the spec:
| What you observe |
Likely root cause |
First check |
| Chips only at impact points |
Shock load too high for the grade |
Switch to tougher grade (M2 / H13), lower HRC 1–2 |
| Crack from edge after grind |
Grind burn / overheated edge |
Verify coolant, reduce feed, re-check temper |
| Burr on every cut |
Clearance too wide |
Reset clearance to 5–10% of thickness |
| Edge rounds in days |
Material too abrasive / blade too soft |
Raise HRC or add coating |
| Material sticks to blade |
Ra > 0.4 µm, no lubrication |
Polish to Ra ≤0.2 µm, add lube |
How Do You Prevent Each Failure?
Once the mode is known, these preventions hold it off — and they belong on the purchase order:
| Failure |
Prevention |
Spec / action |
| Chipping |
Tougher grade, correct HRC |
M2 / H13 at 60–62 HRC, avoid > 62 on shock |
| Cracking |
Controlled grinding, proper temper |
Coolant on, wheel step ≤ 0.05 mm |
| Burr |
Hold clearance & edge radius |
5–10% clearance, regrind at 0.05–0.1 mm |
| Fast wear |
Harder grade or coating |
D2 60–62 HRC, TiCN / DLC coating |
| Galling |
Finer finish, lubrication |
Ra ≤ 0.2 µm, lube at the shear |
FAQ
Why does my blade chip only at certain points on the edge?
Localised chipping means a localised overload — usually a hard spot in the material, a weld or bolt in the feed, or one section of the blade running hotter from poor coolant coverage. Map where the chips appear; if they line up with impact points, the grade is too brittle for the shock and a tougher steel (M2 / H13) at 60–62 HRC is the fix.
Can a reground blade be as good as a new one?
Yes, if the regrind restores the bevel and edge angle to ±1° and the blade still fills its pocket. A proper regrind returns the edge radius to 0.02–0.05 mm and the cut quality to near-new. The limit is the minimum usable dimension: after 3–5 regrinds the blade drops below spec and should be replaced, not reground again.
How do I tell chipping from normal wear?
Wear is a smooth, progressive rounding of the whole edge; chipping is discrete breaks and missing chunks. Run a fingernail or 10× loupe along the edge: smooth and dull means wear (regrind), jagged and notched means chipping (change grade or grinding). A measured certificate showing hardness spread > 2 HRC points to the chipping cause.
Does a coating stop galling, or just delay it?
A coating such as TiCN or DLC genuinely reduces galling by lowering surface energy and friction, not just delaying it — but only if the substrate finish is already Ra ≤0.2 µm and clearance is correct. Coat a rough, mis-set blade and the coating just flakes off at the high spots. Fix the geometry and finish first, then coat.
When should a damaged blade be scrapped rather than repaired?
Scrap it when a crack reaches the body (it will propagate), when edge radius is past 0.2 mm and the blade is already below minimum dimension after 3–5 regrinds, or when a hard spot keeps chipping after a correct regrind. For a crack in the body or a missing corner, repair is not safe — replace. GOOD-KNIFE confirms the call from the measured certificate.
Still seeing edge chipping, burrs, or galling? GOOD-KNIFE matches grade, hardness, coating, and finish to your exact feed, grinds to a controlled process, and ships a measured certificate with every batch so the failure mode is solved before the blade reaches your line. Send a photo of the failure and your machine model and we will pinpoint the cause and the spec that fixes it.